
Publish flutter app
Congratulations , you have finished developing your flutter App and Now I will help you to publish your flutter app to Google Play Store.
I will take you through the whole process step by step to finish your app, and then release it to the world.
Step : 1 – Adding an app icon
We can add app icon to our app using the flutter_launcher_icons package. It’s a very popular package with a lot of likes. I personally use it to generate the icons in all my flutter projects.To install this package in our projects we will first add the flutter_launcher_icons in pubspec.yaml file. To do this, copy these lines and paste it under the dependencies in pubspec.yaml file. And let’s click the get packages icon or run “flutter pub get” in the terminal to get the latest package.
dependencies:
  flutter_launcher_icons: ^0.9.2
Now that we installed the flutter launcher icons package, we need to add the app icon file to our images folder in our project. Then we need to start configuring the newly installed package for that, add these code under the dependencies.
dependencies:
  flutter_launcher_icons: ^0.9.2
flutter_icons:
  image_path: "images/image.png"
  android: true
  ios: true
Set android and ios to true, this tells the package to generate the icons and replace the existing ones for both android and ios. If you don’t want to generate icons for a platform, you can set it to false. After setting up the configuration, you only left to do is run these two lines in your terminal
flutter pub get
flutter pub run flutter_launcher_icons:main
Step : 2 – Signing the app
Our app needs a digital signature to be published in the Play Store. Follow these steps to sign in your app.

1. Goto you android folder and create a new file “key.properties”.
And now paste below lines inside the key.properties file
storePassword=a3bc90ofrtf.        '''keep your password secret and use it here.'''
keyPassword=a3bc90ofrtf
keyAlias=upload
storeFile=<location of the key store file, such as /Users/<user name>/upload-keystore.jks>
Once done adding these files, open your terminal and run the following command.
On Mac/Linux, use the following command:
keytool -genkey -v -keystore ~/upload-keystore.jks -keyalg RSA -keysize 2048 -validity 10000 -alias upload
On Windows, use the following command:
keytool -genkey -v -keystore %userprofile%\upload-keystore.jks -storetype JKS -keyalg RSA -keysize 2048 -validity 10000 -alias upload
Goto the file location where the key is generated and move the ‘upload-keystore.jks‘ file to android > app folder.
then update the storeFile path in key.properties.
storePassword=a3bc90ofrtf.        '''keep your password secret and use it here.'''
keyPassword=a3bc90ofrtf
keyAlias=upload
storeFile=../app/upload-keystore.jks
Step : 3 – Configure signing in gradle
Now Configure your build.gradle file to use your upload key when building your app in release mode,
Before the android { … }, add the keystore information from your properties file:
def keystoreProperties = new Properties()
def keystorePropertiesFile = rootProject.file('key.properties')
if (keystorePropertiesFile.exists()) {
  keystoreProperties.load(new FileInputStream(keystorePropertiesFile))
}
Then scroll down a little bit to find the buildTypes{ … }
buildTypes {
    release {
        // TODO: Add your own signing config for the release build.
        // Signing with the debug keys for now,
        // so `flutter run --release` works.
        signingConfig signingConfigs.debug
    }
}
Now replace the above buildTypes{ … } with below buildTypes{ … } with the following signing configuration info.
signingConfigs {
    release {
        keyAlias keystoreProperties['keyAlias']
        keyPassword keystoreProperties['keyPassword']
        storeFile keystoreProperties['storeFile'] ? file(keystoreProperties['storeFile']) : null
        storePassword keystoreProperties['storePassword']
    }
}
buildTypes {
    release {
        signingConfig signingConfigs.release
    }
}
Step : 4 – Create Android App bundle
First and foremost step to create an app bundle is to run the following command to clean your previous build.
flutter clean
Then run the following command to build the app bundle
flutter build appbundle

This will create a .aab file inside the [project] > build > app > outputs > bundle > release > app-release.aab.This will create a .aab file inside the [project] > build > app > outputs > bundle > release > app-release.aab.
Now it’s time to publish your app via google developer account
Step : 5 – Create Google Developer Account
We need a Google developer account to upload an app to the Play Store. if you have one, then jump over to Step: 5
Get a Google developer account by following these steps:
1. First of all head over to this url https://play.google.com/console
2. Click on the Go to Play Console button

Now we have to choose your email for on which you have to create a google developer account then turn on two factor Authentication for your account and click back button .
Account Type
Then select the type of account we are looking for, and then click on get started button.

In my case its an individual account.
About you
Next tell them about some previous experience with play console and Android , and then click on Next button
Developer account
Give developer name and contact details, then click on Next button

Apps
Give some of our app informations and click on Next button
Terms
lastly you need to confirm both check boxes and with these you agree to the google developer agreement and terms of service then you click on create account and pay button
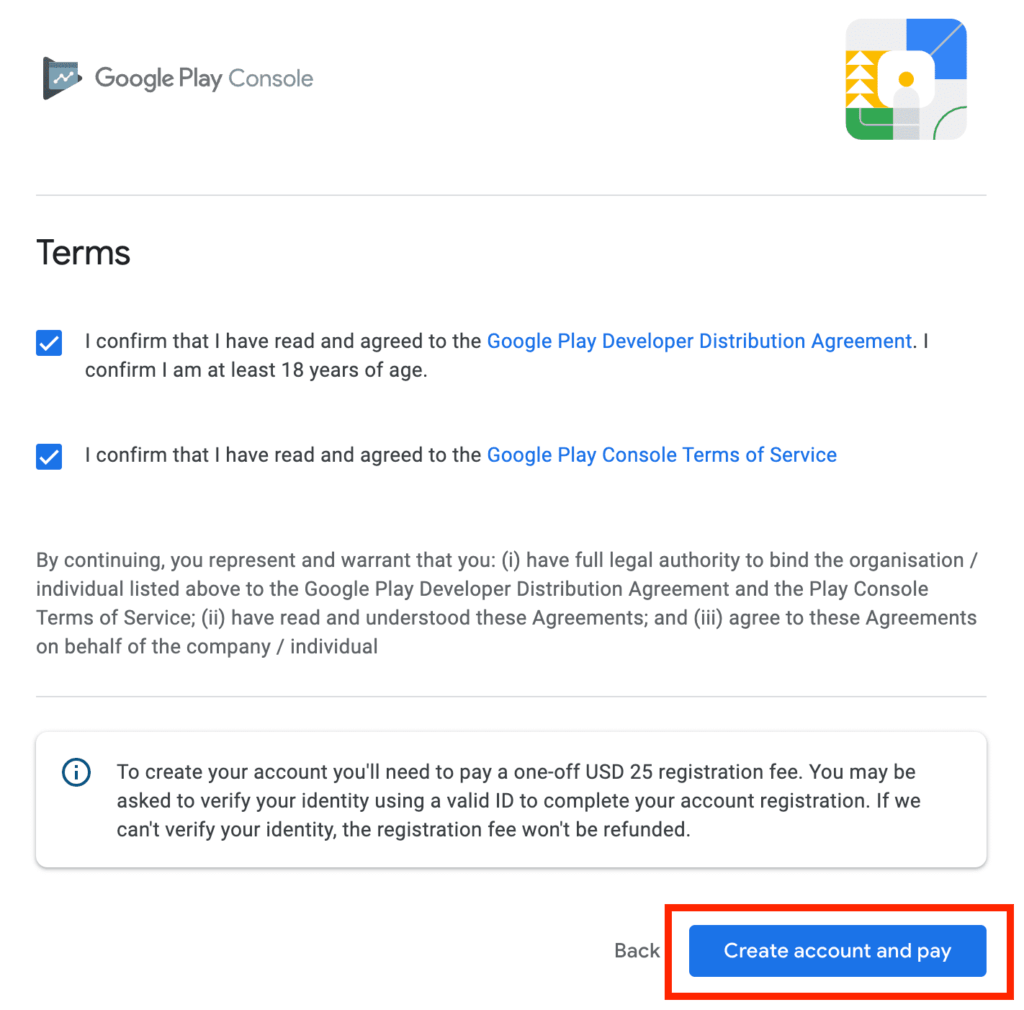
Now you will be asked to pay a registration fee of $25. click on the + button against Add credit or debit card , Enter your card details and click on save card button.

Now click on Buy button to pay registration fee. Then it should say that developer account was created and you can click on Go to Play Console button. with this we have created our google play developer account.
Step : 6 – Create App
First, click the Create an app button and fill out the App Name, Default Language, App Type, Paid or Free and accept the developer program policies and us export laws.
Step : 7 – Adding Logo, Description , Screenshots , Feature Graphics, Videos
It’s now time for us to create the information for the playstore’s store page. In order to do so, head to your app page, scroll to the Store presence, and click the ‘main store listing’.
Here you can give it the app name, description , app icon ,screenshots ,feature graphic etc.
And lastly click on save to submit your changes.
Step : 8 – Store Settings
Goto Store presense > Store settings, Choose your app category here and you can also add here select some text , so that you application can be better found by search engines and other people.
After this scroll here a bit down and enter your email address and optionally you can also add your website and phone number.then later all of these information will be displayed on your google play page. then click on save.
All Tracks
Next you can choose where you want to upload your app to.
| Tracks | Features |
| Internal Testing | Download App on PlayStore (Max. 100 Invited users) No public rating |
| Closed Beta testing | Download App on PlayStore (Only Invited users) No public rating |
| Open Beta testing | Download App on PlayStore (Everyone ) No public rating |
| Production | Public rating |
Here we take production because then it is released to the public. however if you want to test your app then you can take the other tracks for example internal testing, closed beta and open beta testing.
To go to these different tracks simply go here all the way up and then you can choose your Testing and here you can see all these open testing, internal testing and closed testing, And click them and select create new release button to create every time a new release.
In our case we want to make our app public, therefore we go to the track production and here you can create a new release
Step : 8 – Upload App Bundle
In production track click on create new release button,
Here you need to upload the app bundle that you have generated before(in step 4).After the upload is finished the field release name will be filled automatically. Next add some release note, and these are later displayed on your google store page.
Before clicking on Review release button, you need to provide some more Information.
Step : 9 – Add Country and region
Now click on production track, and go to countries and regions , then click on Add countries and regions and then select all the countries where your app would be available.
Step : 9 – App Content
Now scroll down and select the section App content from sidebar. And here we need to give some more information about your app.
1. Privacy policy
Add link to Privacy policy of your app. if you don’t have a privacy policy you can use privacy policy generator to create it.
Now click on start button below the privacy policy section,

And paste your privacy policy here and click on save button and click on back button above the privacy policy.
2. Select App access
Now click on start button below the App access section,
here you need to define your login credentials, in case some part of your application are restricted, so in case you have a login to your application then you need to click “All or some functionality is restricted” and then you need add some instructions with the username and password, so that the google team can then sign in to your application and review your app

click on Add new instructions button to give your login credentials and click on apply

If your app is accessible with no login functionality, you can choose “All functionality is available without special access”.
In my case there is no login functionality therefore i can click “All functionality is available without special access”.
Then click on back button above the App content.
3. Ads
Now click on start button below the Ads section,
Select yes if your app contains ads or no if not. In my case the app doestn’t contains any ads.

And then click on save and click back button above the Ads
4. Content ratings
Now click on start button below the content ratings section,
then click on Start questionnaire button,

Now give your email address, select your app category and click on save.
Then go to questionary tab and answer the given questions. after that click on save.
5. Target audience and content
Now click on start button below the Target audience and content,
select the age groups of your app and click next.

Now select appropriate options in the App details tab
click on next two time, then you will end up with appropriate tab.then click next and save .
6. News app
Now click on start button below the News app,
In case your app is a news app then you need to select yes otherwise you select no and click on save.

7. COVID-19 contact tracing and status apps

check appropriate fields and click on save, then go back to app content tab.
8. Advertising ID
You will not be able to submit releases targeting Android 13 until you complete this section.

9. Data safety
Help users understand how your app collects and shares their data.
Now click on start button below the Data saftey,
Now in overview tab click on next,
then click yes if your app collect or share any of the required user data types otherwise click no.

click on next, Now review your details and click on submit.

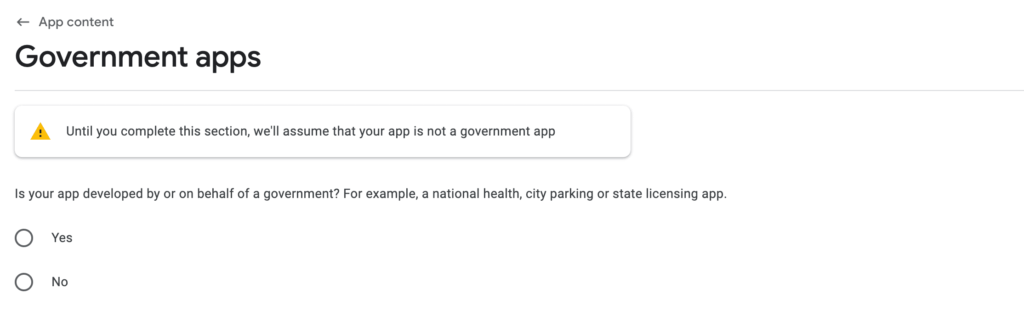
10. Government apps
click yes if your app developed by or on behalf of a government, otherwise click no.
All done.
Now you can roll out your release to the public
Step : 10 – Rollout your Application in Production
Click on production track from sidebar and select edit release button.

Now click on Review release button.

Then Click on Start rollout to Production.
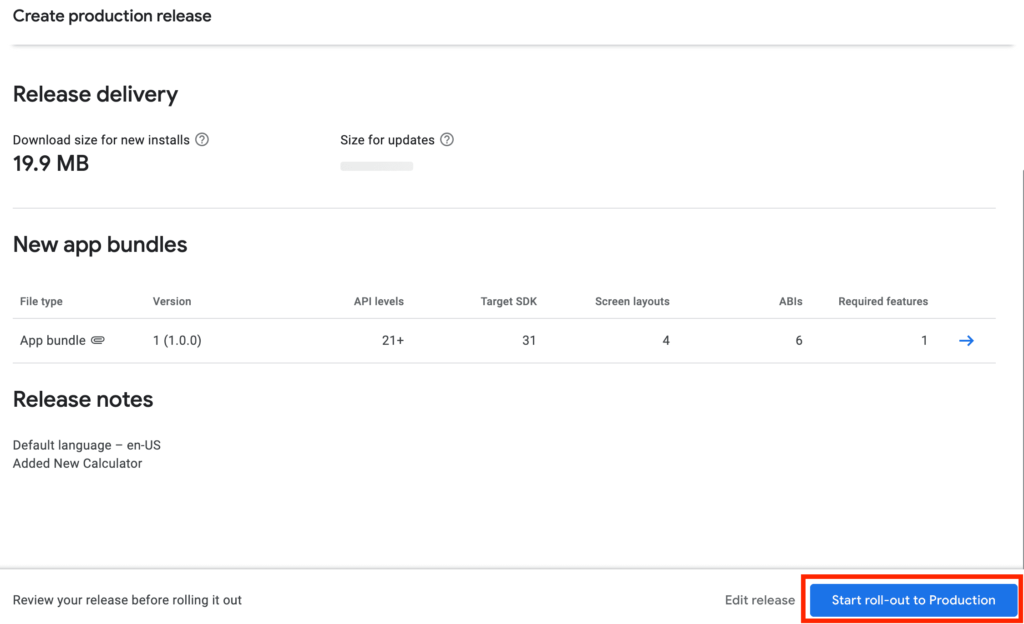
And click on rollout in the pop up to submit your selection.
All set. Now google will manually review your app that you have submitted. which can take upto 48 hours and once it is approved, it will be then listed within the google playStore.
So all in all how to build release and publish your app to the playStore.


Great details..nice article